

original edited final product
BODY, SHAPE, FORM
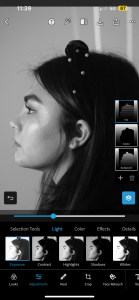
My vision for this assignment was to specifically capture a side profile. I thought it would be nice to photograph this, since this is the side of your face that is seen even before you fully turn to look at a person. I made sure that the lightning was bright enough to light my face up, while also not overwhelming the image. My ISO was set at 800, my shutter speed was at 1/30, and the camera i used was the BLANK.
Tuesday 1/17:
I started to shoot various shots of a side profile with various people, but ultimately decided to photograph myself, since it is very out of my comfort zone. Once i had an image that i approved of, i saved in to my computer using it’s sim card. I opened up the Adobe Photoshop and moved around the exposure, along with he highlights, and tone. After i was content with the final product, i downloaded my image and uploaded it to my assignment page.
Within my image, we can clearly see that the focus is primarily on the side of my face, with my jawline and nose being two facial features that are instantly noticed. I believe my work was a success, i think i captured my idea and obtained the quality of light that was desired. I also feel that the minimal amount of editing also added to the realism of the image itself. The criteria i can list to help others judge my work would be, is the image clear, are you able to understand the focus of the photograph, and lastly if the finished product was executed nicely. I feel multiple emotions while looking at my project. Since it is me in this picture, i feel a sense of embarrassment. Aside from that, i receive of fierce, wholesome feeling from the subject. We can almost the way she is calmly looking into another direction. Overall, i am proud of this assignment and hope to perceive a dark toned, calm, simplistic piece of work.
MAKE A STATEMENT
The purpose of this assignment is to create a piece of art in any form desirable. Whether it is in collage form a photograph, drawings, painting, we will showcase a political or social issue in one of these ways.
PLANNING
Monday: On the first day the project was assigned, i talked with my classmates and brainstormed different ideas. After a long conversation, i finally decided to focus on women’s rights, more specifically abortion. I viewed many different photographs and saw a lot of inspiring pieces from the internet.
Tuesday: This day i decided to have a practice photo shoot with my partner, to see how exactly i wanted to showcase my issue. After about 10 minutes, i figured out the materials and tools i would be using for this. I went home and looked for these things to bring them to class the following day.
Wednesday: In the middle of the week, i realized that it would be hard to capture my vision, since i would be needing a large mirror with a bold colored lipstick, along with a girl to be my subject. I only had one of those things, so i realized that this project would have to get done in the comfort of my phone.
Thursday: In the late afternoon, when i got home, i started photographing all the mirrors i had in my house. I used color, temperature, setting, and contrast to determine the best possible area to take my shots. I took some shots with flash, others without out, some zoomed in, while others were zoomed out and focused.
Friday: After cleaning up, i reviewed all of my images and picked the two that portrayed sadness, a sense of gloom, along with cool tones and calmness. The plan was to layout out both pictures side by side, with the first picture being more vibrant, with warm tones, while my second picture was serious and impactful.
Saturday: Once i chose my images, thought out my editing process, i began to put everything together. The first image was created by writing the words ”Your BODY” in big bold letters. The second image was messier, but i made it by crossing out the word ”Your” that was previously there, along with writing & crossing out the word ”CHOICE”.
Sunday: My final step was to save my images from Photoshop, export them onto my website and begin my Process Porfolio Page. While writing, i researched different artists who photograph political and social issues that are as popular as the one i picked.
BACKGROUND AND INSPO:
I chose this issue as it is very important to me. Abortion is an ongoing issue that is dealt all around the world. People are treated and looked down upon for whatever opinion they have regarding these rights. My main goal was to bring awareness once more to this, while also showcasing my photography.
An artist that really inspired me to continue my idea was Meg Handler. She is a social documentary photographer, photo editor, and curator with a focus on politics, media culture, and social justice. She began her career in the early 90’s in New York City photographing ACT-UP and the reproductive rights movement. Handler also made photographs of the anti-abortion organization, Operation Rescue. A cohort of independent photographers covered all this activity. After 30 years of their photographs rarely being seen, they were finally shown as part of the seminal 2017 exhibition.
FINAL PRODUCT


Here are the final products of my project, along with my original photographs. My ISO was set to 1600, my camera was focused and zoomed in, and my shutter speed was at 1/4 of a second. I do not have any screenshots of my layering on Photoshop, since i only lightly edited.
SCREEN PRINTING
-

- Vector water lily. Lotus illustration. Black and white graphic art line. Linocut style.


Finding source photos is the first step in producing a photographic silkscreen. Images may be obtained via publications like newspapers and periodicals, the internet, or a camera. I chose a lotus flower as my image because i enjoy creating art with simplistic objects. Then, i used Photoshop to turn your digital image into a high-contrast black-and-white bitmap.
After i finished, i printed my image onto a film positive. I then grabbed an open silkscreen, scoop coated, and photosensitive emulsion, and added emulsion to the scoop coater, thinly coating the flat side of the screen.When the coated screens are finished drying, keep them in a dim area or a light-tight container. Flat side down drying is recommended for screens (the side you use the squeegee on should be facing up). I then placed the film positive on the light table and wait 18 minutes with the image facing up right side up. As soon as the screen has done exposing, i washed it off in the sink. I massaged the emulsion that hadn’t been exposed out with a sponge, and rinsed the screen. After this part of the process is completed, i used a squeegee at an angle of between 80 and 90 degrees to push ink through the screen over a t shirt. I went over the shirt a few times until I felt it was dark enough. Then, I removed the lifted up the screen and saw the beautiful flower imprinted on the shirt. I was happy with the outcome, but it was time to clean up. I used a paper towel to remove any extra ink, then spritz some water on the area. Using a gentle sponge and light soap, i washed off all the ink and let the screen dry.


IMAGE RECREATION:
For this assignment, i found an image that spoke to me. Although it is simplistic and does not have any crazy backgrounds or effects along with it, the picture itself holds a deeper meaning. I interpreted the women as always trying to escape a certain world she was put into. I can also relate this to present time, as humans are categorized and forced to fit in a certain aesthetic, religion, gender etc. Now moving on to the actual assignment, i asked my classmate to help me recreate my image. I used a large piece of white construction paper and ripped through the middle, created large and small tares. This not only added depth, but made small for the subject’s face to be shown in the picture. I then set up the backdrop, lighting, and camera to fit the setting. I also made sure to take multiple pictures in different angles to see which one i preferred. After a few shots, i asked her to portray slightly different emotions in order to capture the rawness of the original image. Once i had downloaded the images to my computer, i began to edit in photoshop. Even though i did not use multiple layers, i decided to change the saturation and tint of the image itself. I made sure to blur out her face, and contrast the background. My final result looks similar, but also showcases my own personal touch.
BLOCK PRINTING
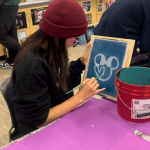
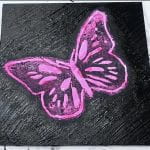
I chose a butterfly as my image to block print because it signifies the loss of my aunt. They were her favorite insect, along with pink being her favorite color. I printed out the image from the internet, and began to shade the back of my paper with a pencil. Once I had completed this step, i transferred the paper onto my block and traced the butterfly with a pen. After that, I began craving with a craving tool, deep enough for no paint to transfer in the craved spots. Then, I painted over my block with pink paint and tried it out on a white piece of paper. I ended up liking the outcome, so I transferred the painted butterfly block onto a 4×5 canvas. I then painted the background black and dried it with a blow dryer. I loved my final product and felt that this project was an amazing way to connect with my peers and also create something of our own.


SURREALISM
I was inspired to create this image, one because I am very found of the sky in the afternoon, and 2 because i love to create simplistic art. This is something that catches my eye, but is also easy enough for a person to understand what is going on. I love how the water almost looks invisible through the reflection.
